[ MY ] HAND + MADE = LIFE

creative collective for the scrapbooker + card maker + paper crafter + memory keeper in my life

CLASSES - CHALLENGES - CONTESTS - CALLS


Showing posts with label special project. Show all posts

Monday, January 20, 2014

Multicultural Day @ school and a cute gingerbread man

The teachers requested a project which is basically a simplified version of display - it would show photos of icons or meaningful things that can represent the country of the choice (by student), alongside a decorated gingerbread man with, of course, some clothing that would show the ethnicity of that country.

In our case, we chose Brazil. And what can be cuter for a brazilian gingerbread man than a set of soccer ball player outfit? We followed the colors and details carefully so it can tell by itself.

I made sure JW got the cutting part covered. I'm so glad to see how much he improved in his cutting skills since kindergarten days, not too bad for a first grader now.
This can also be just a mommy thing. :D

I will come back with another post about the display that is in the school right now.


Thanks for visiting!


Monday, November 25, 2013

for a dear friend, a folder card to hold and to keep

Today I want to share a folder card made for a special friend in my life, Carol H.
We go to the same Bible study small group in our church and she had been a wonderful friend since the day one we met back in 2012.

The purpose of the card, besides sending our group's warm messages for the period we missed her (when she couldn't attend some of the sessions)  it was also meant to hold few study sheets I saved for her during the studies.It has two folded pockets, nothing to hold bulky items but just few small pieces.


I liked the vibrant colors in this card. It's from a beautiful paper collection from Close To My Heart that was available in promotional campaign only.

I'm very grateful for her and have her as my friend and sister.


Wednesday, March 14, 2012

a sympathy card


Today I'm posting this to share a sympathy card I made back in February, to our pastor and his family. His so loved father passed away about a month ago...and yes, it was Valentines Day.

During the making of the card, I just wanted to do something really simple. Without excessive embellishments. To honor the special person and his wonderful family.

Warm hugs!


Tuesday, February 14, 2012

Our little valentines[cards}


Mommy & me {ed.}
:)

My 5 y-o woke up today asking to make "something" for daddy - who's working just like any other day of the week - so I came up with making valentine cards*, I mean little cards.

This is what we "made together".

*stamps images from CTMH.

SO simple, so sweet.

Happy Valentines,


Friday, February 10, 2012

customize images with your favorite stamps

I'd like to share this video today which shows some fabulous idea on how to extend the use of your stamps...it can be (almost) any pattern style stamp you have and like.
I'll be sharing some of my own projects later on this week, in the mean while...enjoy the video!


Warm hugs,

Tuesday, February 7, 2012

Open House - thank you notes


Hello...this post is to share some of the Thank You cards I made and sent to the customers, students and friends that visited our Open House few days ago.

It was so great seeing some long-time-no-see friends and surprised by unexpected friends, we all had lots of fun. I've prepared the new living room to be "show room" as I wanted to share my latest paper crafting artworks and scrapbook projects. Seems like everyone had so much fun!

In these note cards I used some of the latest embellishments from CTMH(Paradise baker's twine, Mile Post shapes, mini-medley olive collection, etc). Fun!
The patterned paper is Typeset.

Good night,


Sunday, November 20, 2011

Winter Thoughts Mini Accordion Album


This is a 6" x 6" accordion style album, basically with 8 pages including the cover and backcover.
Some pages background were made from Art Philosophy die cut collection.
I also used the CTMH new [big] snowflake overlay to embellish the cover with a shiny rhinestones-filled brad. Love these.
Simple color scheme and accents.

Blue and chocolate, way to go!


Tuesday, July 5, 2011

White Dream in July


I'd like to share today one cute gift I received from Terri ( our Christian Paper Artist Group ) who made and sent this beautiful vintage match box, in last December.
She used everything white in a rich combination of whites which gave the project an amazingly pretty effect of textures.

Loved how she used different materials and fibers. So classy and sweet.
Inside of the box there are lots of little treats and vintage goodies that made my day when it arrived to me. So thoughtful gift for a scrapbooker, from a very talented mixed media artist.
:)

Again, the wonderful feeling of a white Christmas in July.

Sharing with you - :),

Saturday, April 2, 2011

April is here! Sharing a new project...


Hello Spring...

Here is the new display board I finished this past weekend at store so to promote my upcoming classes for Scrapbook and Design & U program with EK Success. Besides the Christmas Card going beyond the old Holiday Red, I also added the 12" x 12" layout I made for the Wedding Event days before, using colors that "escape" from the traditional B&W: bright pink and juniper green plus silver. The embellishments are purposely put to remind the viewer about nature and in this case, Spring. So butterflies and flowers have a great presence in the layout.
During the making of the layout many "scrappy" people stopped by to share their thoughts about this layout and I noticed most of them were so very pleased with the colors. I'm glad to be able to bring some new ideas to them and to refresh old ones they already have.
:)

Supplies: Papers(My Minds Eyes, Recollection, DCWV), stickers(Recollection, Making Memories, K&Company), flowers, butterflies, gems and pearls(Recollection), Punch(MS, EK Success), ink(Colorbok, Tsukineko), ribbon(Offray), adhesive (Provo, Tombow), diecut(K&Company).

So take a look at the details of this project and feel free to share your thoughts too!

Have a great Spring!

Tuesday, March 22, 2011

gift giving: a scrapbook layout for Laura


Hi everyone:

At this time I'd like to share this two pages layout I made recently as a gift for Susan, one of the brazilian mommies I met last year. The layout title "bebe Laura" (bebe=baby)which is the name of her baby girl born in February.

I wanted to use a subtle combo of colors for this layout. And I liked the outcome of it.
The right page of the layout has few matted spots where features messages from four of the mommies of the Mamaes Brasil group. I found this such a wonderful way to spread the love and welcome the arrival of a new baby.

This layout has no predetermined blocks for photos so this means there are many ways to size and to hold the pictures. It could be a big 5"x 7" or 6"x 6", few traditional 4"x 6" or multiple 3"x 3". Or anything in between.

Supplies:
papers: CTMH; flowers: Prima, CTMH; brads:CTMH; stamp and ink:CTMH; kraft border: CTMH; Liquid Glass (CTMH); ribbon(misc.).

Sending sunshines,

Friday, March 18, 2011

Aula de Scrapbook - "Mamaes Brasil" group


Today I'm sharing the project that was designed to be taught last week in a group setting of Bay area's brazilian mommies I met back in last December.

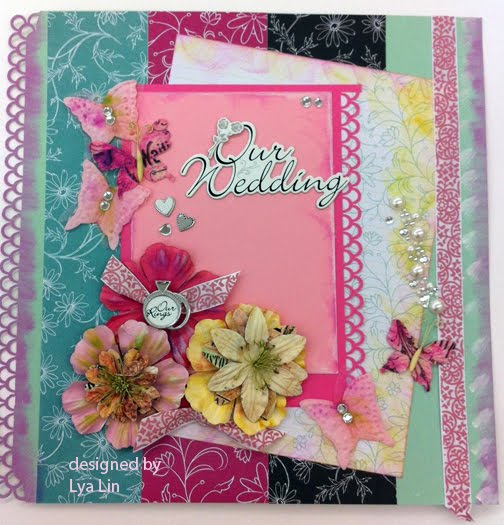
This 6" x 6" accordion style mini album is fun and easy to make - the student can get it done within 1:30 to 2 hours and the kit each person receives allows lots of leftover supplies to take home(brads, stickers, metal embellishments, ribbons, etc) so to work with other projects as desired.

The best of all is they can go home with a finished project - ready to use

Supplies: all materials from CTMH

................

Below are some of the class notes I had (traslated in Brazilian Portuguese):


Observacoes:

1. Os papeis estampados ou “patterned papers”( B&T= background and texture) sao de estilo dupla face que te permite variar cores mantendo o mesmo padrao de design. Voce pode copiar o meu modelo ou trocar de cor, se preferir.

2. Os tipos de cola que usei neste projeto sao: glue dots(para “metal “tag”), glue tape(tipo runner – para papeis em geral), sticky ou tacky tape( cola forte para fita de tecido”ribbon”). Para as fotos, voce podera usar cola tipo tab, square ou tape, desde que seja “ acid-free” ou “archival-free”. Veja sempre a embalagem antes de comprar.

3. Recomendo o uso de perfurador ou “paper piercer” para colocar os brads, assim evita "amassar" o papel. Eu prefiro usar paper piercer pois este tambem ajuda a abrir e fechar os hastes dos brads.

4. E’ mais facil montar a pagina com todas as partes e depois aderir a folha do album. Assim evita extra manuseios que podem “judiar” do album.